Git - Keeping Track of Files
Lesson Objectives#
- Add an ssh key to your github account
- Describe what git is and what it does
- Explain the difference between git and other versioning tools
- Create a repository in github
- Clone that repository
- Stage Files
- Commit Files
- Push files
- Pull changes from remote repo
- Fork a repository
- Pull changes from original repo
- Create an issue for the original repository
- Create a pull request to original repository
- Create a branch
- Push a branch to the repo
- Merge a branch into another branch
Add an ssh key to your github account#
- When you get tired of always entering your github password, you can use the ssh URL (as opposed to the https URL) when cloning a repo
- You'll need to also add what's called an ssh key to github https://help.github.com/articles/generating-an-ssh-key/
- Now you can use the ssh url when cloning instead of https
Describe what git is and what it does#
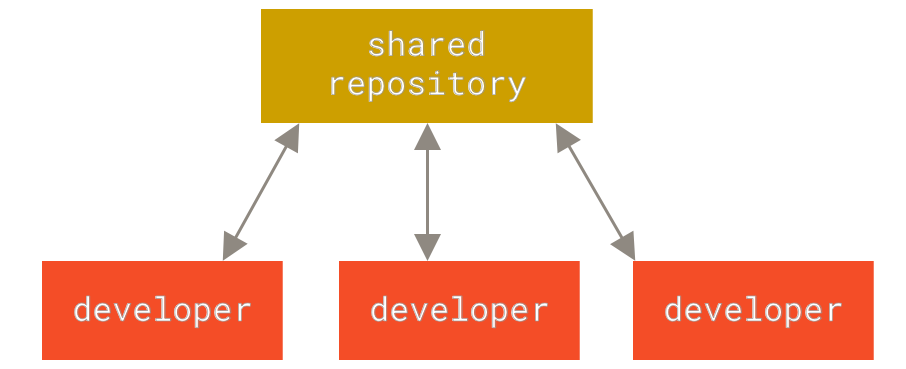
- Git is just a tool that allows you to move project specific files from your "local" (or personal) computer to another internet-connected computer which is acting as a central location for your code. This other computer is called a "remote repository."
- All other computers that want to contribute to this specific project, will use the same remote repository (central computer), but send files from their own local computers.
Explain the difference between git and other versioning tools#
- In the old days, people would use FTP (File Transfer Protocol) to send their files to central computer
- The issue:
- Two people (Person A, Person B) copy the same file from the remote repo at roughly the same time
- They both make changes
- Person A uploads their changes
- Person B uploads their changes, overwriting Person A's changes
- The next step was to create a locking mechanism
- How it worked
- Person A would "check out" a file (like in a library)
- Person B would not be able to check out that file until it was checked back in
- Person A would make changes to the file and then check it back in
- Person B could now check out that file
- The issue
- Person B would have to wait for person A to finish with a file to start work on it
- The next step was tools like CVS and SVN
- How it worked
- Both Person A and Person B could check out a file at the same time
- Person A modifies the file and checks it back in
- Person B modifies the file, tries to check it back in, but cannot
- Person B must re-check out the file that now includes the changes made by person A
- CVS/SVN will attempt to
mergethe changes together - As long as the changes made by both Person A and Person B are on different lines, this will succeed
- Once the changes made by Person A have been merged with Person B's version of the file, Person B can now check in their file
- The issue
- If a person is not ready to check in a file, there is no way to keep track of the changes made to that file
- If something goes wrong before checking the file back in, the user must, figure out what happened, go through an almost endless number of Undo commands in their text editor, or revert their file to version that is in the repository. A lot of work could be lost
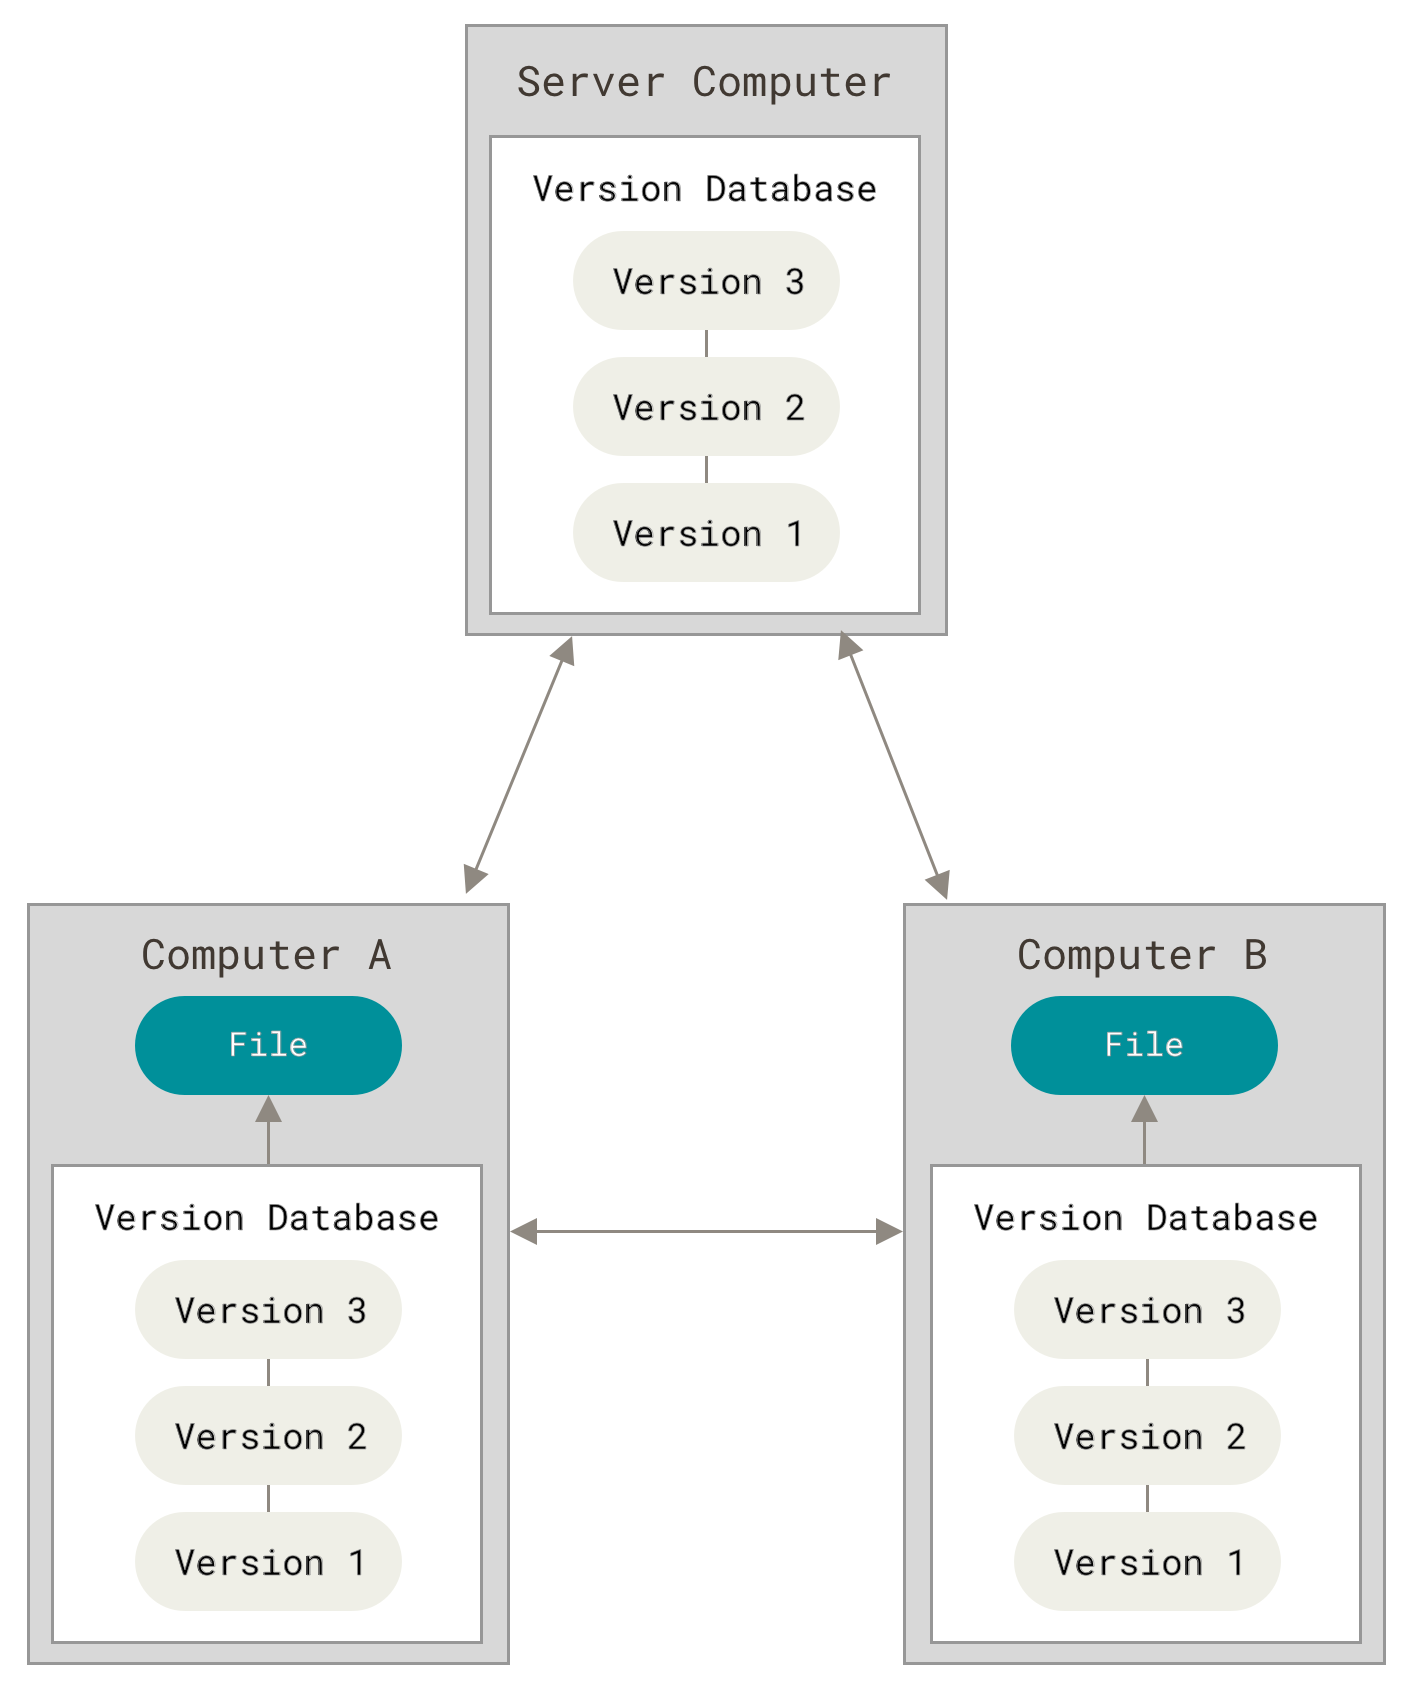
- Git functions just like CVS and SVN, but it adds a local repository
- This allows a user to keep a log of their local changes before finally pushing everything back to the remote repository
- The user can also travel "back in time" to previous states that have been saved locally, but not yet pushed to the remote repository. This is great for when something goes wrong
- The process:
- Add files whose changes you want to be logged
- Log the changes of the files that were added (called making a
"commit") - Once all commits have been made, and you're ready to send your changes to the remote repo
"pull"any changes that have been made to the repo since you last synced your local repo with the remote repo"push"your changes to the remote repo.
Create a repository in github#
- Go to https://git.generalassemb.ly
- On the right click the green button that says "New Repository"
- Give the repo a name and click
Create
Clone that repository#
- Once you've created the repo, you'll be taken to repo page
- In the "Quick setup" section, copy and paste the SSH url
- Go to a suitable location in the terminal (let's do
~/dev/) and typegit cloneand paste the https url (e.g.git clone git@git.generalassemb.ly:mahuntington/asdfasdf.git)
Stage Files#
cd into the repo and use ls -a to check for a .git repo
Now create specific_file.txt and make some changes to it.
Once you've finished making changes for the moment, it's time to tell git which files need to have their changes logged
git add specific_file.txtwill log all changes to the file specific_file.textgit add .will log the changes to all files in the current working directorygit add some_dir/will log the changes to all files in the some_dir directorygit add -Awill add all files in the local repo that have been modified
To see the status of which files are in the process of being committed use git status
Commit Files#
Log the files, and give the log a description (or "message") so you can easily remember what was done
git commit -m "changed the database structure to allow for an email address for each user"- check your commits with
git log
Push files#
Push your changes to the remote repository
git push origin mainoriginis the nickname of the remote repo.mainis the name of the branch (covered later), this is usuallymainwhen you start out.
Pull changes from remote repo#
Pull any changes others made to the repo into your local version of the repo
git pull origin main
Fork a repository#
Open source software is popular because the source code for an open source application is available for viewing on the internet. If you want to play around with the code of an open source app on github, you can simply fork the repo and make changes to it there.
- Find the class repo on github
- In the upper right, click the
forkbutton - Choose which user (or organization if you belong to any) should create the duplicated repo
- Clone, add, commit, push as normal
Pull changes from original repo#
Sometimes you want to get changes that have been made to the original repository
- Add original remote repo with
git remote add upstream git@git.generalassemb.ly:mahuntington/asdfasdf.gitupstreamis a conventional name, it can be anything, though- update the URL to that of the original repo NOT your fork
- Pull with
git pull upstream main
Create an issue for the original repository#
Sometimes you want to send messages to the maintainers of the original repository
- Go to the original repo on
git.generalassemb.ly - Click on the
"Issues"tab at the top - Click the green
"New issue"button on the right - Enter a title and a comment
- Click
"Submit new issue"
Create a pull request to original repository#
If you have made a change to your fork that you want to be integrated into the original repo, you'll have to ask the original repo owner to review and merge your changes into theirs.
- Go to the original repo
- Click the tab marked
Pull requests - Click
"New pull request" - Underneath
"Compare changes"click"compare across forks" - For the
"head fork"choose your fork. Leave"base fork"as the original repo - Next to the
"base fork"and"head fork"buttons are drop downs for which branch of your fork (compare) should be merged into which original repo branch (base). - Click
"Create pull request"
Create a branch#
- When working on a specific feature, it's generally a good idea to create a
"branch" - This is purely for organizational purposes
- In general, the
mainbranch is for finished features - If you are working on a feature, it's not complete, but you want to save those changes to the repo (perhaps it's the end of the day), you can use branches to keep your changes off the
mainbranch
- In general, the
- To list all branches run
git branch - To create a new branch run
git branch newbranch - Switch to a branch using
git checkout foo. From now on, until you change branches again, all commits will be created on that branch
Push a branch to the repo#
git push origin newbranchwill push the currently active branch to the remote on a branch called "newbranch"- in general, you should push a local branch to a branch on the remote repo with the same name
Merge a branch into another branch#
Once you are finished with branch and want to merge it (usually back into main):
- switch to the branch that you want to merge the new branch INTO (
git checkout main) - merge the branch using
git merge newbranch. This will merge thenewbranchbranch into the currently active branch (usuallymain)